> ## Documentation Index
> Fetch the complete documentation index at: https://docs.encoreos.io/llms.txt
> Use this file to discover all available pages before exploring further.
# Budgets & Forecasts
> Tabbed hub for managing budgets, budget alerts, scenarios, rolling forecasts, and budget templates in one place.
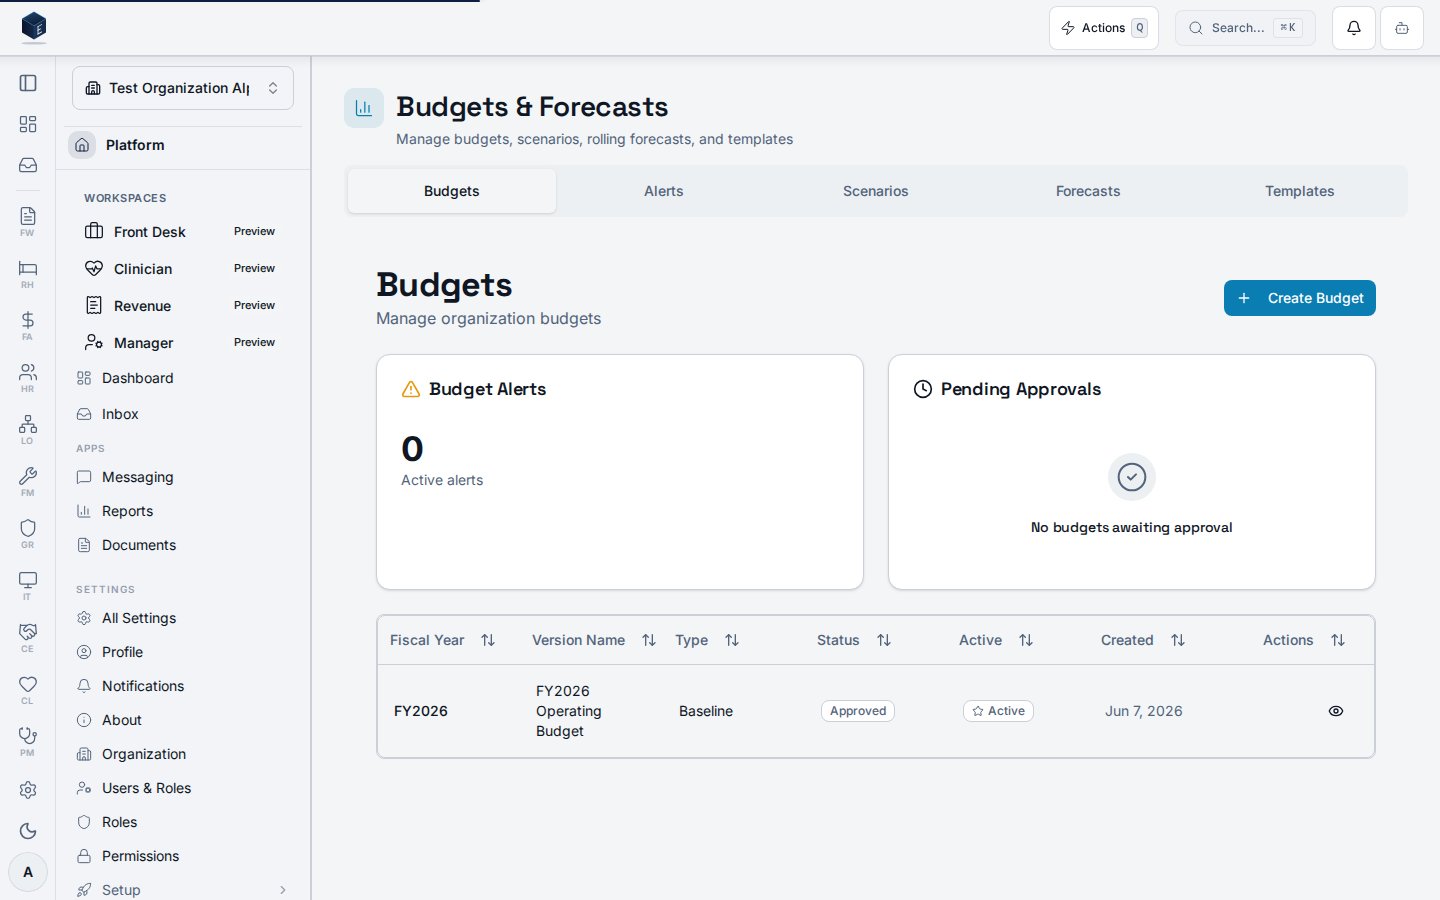
Budgets & Forecasts is the central hub for all budgeting and forecasting activity, presenting five tabs: Budgets, Alerts, Scenarios, Forecasts, and Templates. Route: `/fa/budgeting`
 ## Overview
The hub uses `useTabUrlState` to sync the active tab with the URL query parameter `?tab=` (valid values: `budgets`, `alerts`, `scenarios`, `forecasts`, `templates`). Each tab lazy-loads its content. Legacy direct routes (`/fa/budgets`, `/fa/budget-scenarios`, `/fa/rolling-forecasts`, `/fa/budget-templates`, `/fa/template-library`) redirect here with the appropriate `?tab=` value.
## Who it's for
Access follows your organization's role and module configuration. ## Before you start
* No prerequisites for viewing. Creating or modifying records within each tab may require additional permissions.
## Steps
Go to `/fa/budgeting` or follow a redirect from any legacy budget route.
Choose from Budgets, Alerts, Scenarios, Forecasts, or Templates. The selected tab is reflected in the URL.
Each tab provides its own list view, actions, and navigation to detail pages.
## Key concepts
* **`useTabUrlState`** — Platform hook that reads and writes the `?tab=` query parameter for shareable, bookmarkable tab state.
* **Tabs**: `budgets`, `alerts`, `scenarios`, `forecasts`, `templates`.
## Viewing a budget scenario
The Scenario Details page at `/fa/budget-scenarios/:id` shows a single budget scenario's lines and comparisons. (The list path `/fa/budget-scenarios` redirects to `/fa/budgeting?tab=scenarios`.) Permission required: `fa.budget_scenarios.view`.
The page uses a tabbed layout (default: `lines`), loading the scenario via `useBudgetScenario` and its lines via `useScenarioBudgetLines`:
* **Lines tab** — `ScenarioBudgetLineEditor` for editing per-account budget amounts.
* **Comparison tab** — `ScenarioComparisonView` for viewing differences.
Actions include activating the scenario (sets `status` to `'active'`) and deleting it. The scenario name is shown in the breadcrumb.
1. Navigate to `/fa/budgeting?tab=scenarios` and click a scenario, or go directly to `/fa/budget-scenarios/:id`.
2. Review the **Lines** tab to see the budget line editor.
3. Click the **Comparison** tab to review `ScenarioComparisonView`.
4. To activate, click the **Activate** action (requires appropriate permission). Status is updated to `active`.
5. To delete, use the delete action and confirm the dialog.
## Creating a budget scenario
The New Scenario page at `/fa/budget-scenarios/new` creates a what-if budget scenario. Permission required: `fa.budget_scenarios.create`.
The form uses `BudgetScenarioForm`. On submit, `useCreateBudgetScenario` is called followed by `useCreateScenarioBudgetLine` (batch) for any lines. The scenario is created with `status: "draft"`. On success you are redirected to `/fa/budget-scenarios/:id`.
Before you start: determine the scenario name, type, and optional description; know which base budget (if any) you are modeling from; prepare any scenario assumptions and notes.
1. Navigate to `/fa/budgeting?tab=scenarios` and select **New Scenario**, or go to `/fa/budget-scenarios/new`.
2. Fill in the scenario name, type, description, and optional base budget.
3. Add scenario lines if applicable (account, period, budget amount per line).
4. Select **Create**. Scenario header and lines are saved in a single batch operation.
5. You are redirected to the new scenario's detail page.
**Key concepts:** `scenario_type` controls categorization; `assumptions` is a JSON field; scenario lines are individual budget amounts per account/period/dimension.
## Editing a budget scenario
The Edit Scenario page at `/fa/budget-scenarios/:id/edit` updates an existing scenario's header and period-level budget lines. Permission required: `fa.budget_scenarios.edit`.
`BudgetScenarioEditPage` fetches the scenario via `useBudgetScenario` and its lines via `useScenarioBudgetLines`. On submit: (1) updates the header (`scenario_name`, `scenario_type`, `scenario_description`, `base_budget_id`, `assumptions`, `notes`) via `useUpdateBudgetScenario`; (2) creates new lines, updates changed lines, and deletes removed lines. On success, navigates to `/fa/budget-scenarios/:id`.
| Concept | Description |
| ------------------------ | ------------------------------------------------------- |
| `BudgetScenarioForm` | Shared form for scenario header and budget lines |
| `useBudgetScenario` | Hook fetching the existing scenario header |
| `useScenarioBudgetLines` | Hook fetching budget lines for the scenario |
| `assumptions` | JSON field; SME: confirm schema and interpretation |
| `base_budget_id` | Optional reference to a budget the scenario is based on |
1. From the Budgeting Hub scenarios tab, open the scenario and click **Edit** to go to `/fa/budget-scenarios/:id/edit`.
2. Update header fields (name, type, description, base budget, assumptions, notes).
3. Add, update, or remove period budget lines as needed.
4. Click **Save**. On success the page navigates to the scenario detail.
## Viewing a budget template
The Template Details page at `/fa/budget-templates/:id` shows a budget template's structure, line items, and sharing configuration. (The list path `/fa/budget-templates` and `/fa/template-library` redirect to `/fa/budgeting?tab=templates`.) Permission required: `fa.budget_templates.view`.
The page loads the template via `useBudgetTemplateById` and enriched lines via `useTemplateWithEnrichedLines`. Components include `ApplyTemplateDialog`, `TemplateExportDialog`, `TemplateSharingBadge`, and a `DataTable` of line items (account number, name, budget amount, notes). Actions: edit, delete, apply, and export.
1. Navigate to `/fa/budgeting?tab=templates` and click a template, or go to `/fa/budget-templates/:id`.
2. Review the line items table and sharing badge.
3. Click **Apply** to open `ApplyTemplateDialog` and apply the template to a budget.
4. Click **Export** to open `TemplateExportDialog`.
5. Click **Edit** to navigate to the edit route (requires `fa.budget_templates.edit`).
6. Click **Delete** and confirm the alert dialog to remove the template.
**Key concepts:** Template lines have `account_id`, `budget_amount`, and optional `notes`; sharing level is displayed via `TemplateSharingBadge`.
## Creating a budget template
The New Template page at `/fa/budget-templates/new` creates a reusable budget template. Permission required: `fa.budget_templates.create`. (Note: the alternate route `/fa/reports/statements/templates/new` opens the Statement Template Designer Wizard — a separate 5-step wizard for financial statement layouts requiring `fa.statement-templates.create`.)
`BudgetTemplateNewPage` renders `BudgetTemplateForm` with fields for template name, description, category, sharing level, and notes. `CreateFromBudgetDialog` is available to seed the template from an existing budget. On submit, `useCreateBudgetTemplate` saves the record with an empty `template_structure` and redirects to `/fa/budget-templates`.
Before you start: know the template name and category; optionally have an existing budget to use as a starting point.
1. Navigate to `/fa/budgeting?tab=templates` and select **New Template**, or go to `/fa/budget-templates/new`.
2. Fill in template name, description, category, sharing level, and notes.
3. Optionally use **Create from Budget** to seed lines from an existing budget.
4. Select **Create**. The template is saved and you return to the template list.
**Key concepts:** `template_structure` is a JSON object (`{ lines: [], metadata: null }`) initialized on creation; `sharing_level` controls visibility scope.
## Editing a budget template
The Edit Template page at `/fa/budget-templates/:id/edit` updates an existing budget template's name, description, category, sharing level, and notes. Permission required: `fa.budget_templates.edit`. (Note: the alternate route `/fa/reports/statements/templates/:templateId/edit` opens `StatementTemplateWizardPage` requiring `fa.statement-templates.update` — a separate flow.)
`BudgetTemplateEditPage` fetches the template via `useBudgetTemplateById` and renders `BudgetTemplateForm` pre-populated. On submit, `useUpdateBudgetTemplate` is called with `template_name`, `template_description`, `template_category`, `sharing_level`, and `notes`. On success, navigates to `/fa/budget-templates/:id`.
| Concept | Description |
| ----------------------------- | ---------------------------------------------------- |
| `BudgetTemplateForm` | Form for budget template metadata |
| `useBudgetTemplateById` | Hook fetching the existing budget template |
| `useUpdateBudgetTemplate` | Mutation hook persisting budget template edits |
| `StatementTemplateWizardPage` | Wizard for statement template edit (alternate route) |
| `sharing_level` | SME: confirm allowed values and access scope |
1. From the Budgeting Hub templates tab, open the budget template and click **Edit** to go to `/fa/budget-templates/:id/edit`.
2. Update `template_name`, `template_description`, `template_category`, `sharing_level`, and `notes`.
3. Click **Save**. On success you navigate to the template detail view.
## Related
Finance & Revenue core overview.
This page documents shipped product behavior. It is not medical, legal, or
billing advice. Verify against your organization's policies and applicable
regulations before using it for clinical, compliance, or billing decisions.
Protected health information (PHI) shown in the product is governed by your
tenant's access controls and is never exposed in this documentation.
* src/routes/fa.tsx
* src/cores/fa/pages/BudgetingHubPage.tsx
* src/cores/fa/pages/BudgetScenarioDetailPage.tsx
* src/cores/fa/pages/BudgetScenarioNewPage.tsx
* src/cores/fa/pages/BudgetScenarioEditPage.tsx
* src/cores/fa/pages/BudgetTemplateDetailPage.tsx
* src/cores/fa/pages/BudgetTemplateNewPage.tsx
* src/cores/fa/pages/BudgetTemplateEditPage.tsx
* src/cores/fa/hooks/useBudgetScenarioDetail.ts
* src/cores/fa/hooks/useBudgetScenarioMutation.ts
* src/cores/fa/hooks/useBudgetTemplateDetail.ts
* src/cores/fa/hooks/useBudgetTemplateMutation.ts
* src/cores/fa/components/BudgetScenarioForm.tsx
* src/cores/fa/components/BudgetTemplateForm.tsx
* src/cores/fa/components/ScenarioBudgetLineEditor.tsx
* src/cores/fa/components/ApplyTemplateDialog.tsx
* src/cores/fa/wizards/statement-template/StatementTemplateWizardPage.tsx
## Overview
The hub uses `useTabUrlState` to sync the active tab with the URL query parameter `?tab=` (valid values: `budgets`, `alerts`, `scenarios`, `forecasts`, `templates`). Each tab lazy-loads its content. Legacy direct routes (`/fa/budgets`, `/fa/budget-scenarios`, `/fa/rolling-forecasts`, `/fa/budget-templates`, `/fa/template-library`) redirect here with the appropriate `?tab=` value.
## Who it's for
Access follows your organization's role and module configuration. ## Before you start
* No prerequisites for viewing. Creating or modifying records within each tab may require additional permissions.
## Steps
Go to `/fa/budgeting` or follow a redirect from any legacy budget route.
Choose from Budgets, Alerts, Scenarios, Forecasts, or Templates. The selected tab is reflected in the URL.
Each tab provides its own list view, actions, and navigation to detail pages.
## Key concepts
* **`useTabUrlState`** — Platform hook that reads and writes the `?tab=` query parameter for shareable, bookmarkable tab state.
* **Tabs**: `budgets`, `alerts`, `scenarios`, `forecasts`, `templates`.
## Viewing a budget scenario
The Scenario Details page at `/fa/budget-scenarios/:id` shows a single budget scenario's lines and comparisons. (The list path `/fa/budget-scenarios` redirects to `/fa/budgeting?tab=scenarios`.) Permission required: `fa.budget_scenarios.view`.
The page uses a tabbed layout (default: `lines`), loading the scenario via `useBudgetScenario` and its lines via `useScenarioBudgetLines`:
* **Lines tab** — `ScenarioBudgetLineEditor` for editing per-account budget amounts.
* **Comparison tab** — `ScenarioComparisonView` for viewing differences.
Actions include activating the scenario (sets `status` to `'active'`) and deleting it. The scenario name is shown in the breadcrumb.
1. Navigate to `/fa/budgeting?tab=scenarios` and click a scenario, or go directly to `/fa/budget-scenarios/:id`.
2. Review the **Lines** tab to see the budget line editor.
3. Click the **Comparison** tab to review `ScenarioComparisonView`.
4. To activate, click the **Activate** action (requires appropriate permission). Status is updated to `active`.
5. To delete, use the delete action and confirm the dialog.
## Creating a budget scenario
The New Scenario page at `/fa/budget-scenarios/new` creates a what-if budget scenario. Permission required: `fa.budget_scenarios.create`.
The form uses `BudgetScenarioForm`. On submit, `useCreateBudgetScenario` is called followed by `useCreateScenarioBudgetLine` (batch) for any lines. The scenario is created with `status: "draft"`. On success you are redirected to `/fa/budget-scenarios/:id`.
Before you start: determine the scenario name, type, and optional description; know which base budget (if any) you are modeling from; prepare any scenario assumptions and notes.
1. Navigate to `/fa/budgeting?tab=scenarios` and select **New Scenario**, or go to `/fa/budget-scenarios/new`.
2. Fill in the scenario name, type, description, and optional base budget.
3. Add scenario lines if applicable (account, period, budget amount per line).
4. Select **Create**. Scenario header and lines are saved in a single batch operation.
5. You are redirected to the new scenario's detail page.
**Key concepts:** `scenario_type` controls categorization; `assumptions` is a JSON field; scenario lines are individual budget amounts per account/period/dimension.
## Editing a budget scenario
The Edit Scenario page at `/fa/budget-scenarios/:id/edit` updates an existing scenario's header and period-level budget lines. Permission required: `fa.budget_scenarios.edit`.
`BudgetScenarioEditPage` fetches the scenario via `useBudgetScenario` and its lines via `useScenarioBudgetLines`. On submit: (1) updates the header (`scenario_name`, `scenario_type`, `scenario_description`, `base_budget_id`, `assumptions`, `notes`) via `useUpdateBudgetScenario`; (2) creates new lines, updates changed lines, and deletes removed lines. On success, navigates to `/fa/budget-scenarios/:id`.
| Concept | Description |
| ------------------------ | ------------------------------------------------------- |
| `BudgetScenarioForm` | Shared form for scenario header and budget lines |
| `useBudgetScenario` | Hook fetching the existing scenario header |
| `useScenarioBudgetLines` | Hook fetching budget lines for the scenario |
| `assumptions` | JSON field; SME: confirm schema and interpretation |
| `base_budget_id` | Optional reference to a budget the scenario is based on |
1. From the Budgeting Hub scenarios tab, open the scenario and click **Edit** to go to `/fa/budget-scenarios/:id/edit`.
2. Update header fields (name, type, description, base budget, assumptions, notes).
3. Add, update, or remove period budget lines as needed.
4. Click **Save**. On success the page navigates to the scenario detail.
## Viewing a budget template
The Template Details page at `/fa/budget-templates/:id` shows a budget template's structure, line items, and sharing configuration. (The list path `/fa/budget-templates` and `/fa/template-library` redirect to `/fa/budgeting?tab=templates`.) Permission required: `fa.budget_templates.view`.
The page loads the template via `useBudgetTemplateById` and enriched lines via `useTemplateWithEnrichedLines`. Components include `ApplyTemplateDialog`, `TemplateExportDialog`, `TemplateSharingBadge`, and a `DataTable` of line items (account number, name, budget amount, notes). Actions: edit, delete, apply, and export.
1. Navigate to `/fa/budgeting?tab=templates` and click a template, or go to `/fa/budget-templates/:id`.
2. Review the line items table and sharing badge.
3. Click **Apply** to open `ApplyTemplateDialog` and apply the template to a budget.
4. Click **Export** to open `TemplateExportDialog`.
5. Click **Edit** to navigate to the edit route (requires `fa.budget_templates.edit`).
6. Click **Delete** and confirm the alert dialog to remove the template.
**Key concepts:** Template lines have `account_id`, `budget_amount`, and optional `notes`; sharing level is displayed via `TemplateSharingBadge`.
## Creating a budget template
The New Template page at `/fa/budget-templates/new` creates a reusable budget template. Permission required: `fa.budget_templates.create`. (Note: the alternate route `/fa/reports/statements/templates/new` opens the Statement Template Designer Wizard — a separate 5-step wizard for financial statement layouts requiring `fa.statement-templates.create`.)
`BudgetTemplateNewPage` renders `BudgetTemplateForm` with fields for template name, description, category, sharing level, and notes. `CreateFromBudgetDialog` is available to seed the template from an existing budget. On submit, `useCreateBudgetTemplate` saves the record with an empty `template_structure` and redirects to `/fa/budget-templates`.
Before you start: know the template name and category; optionally have an existing budget to use as a starting point.
1. Navigate to `/fa/budgeting?tab=templates` and select **New Template**, or go to `/fa/budget-templates/new`.
2. Fill in template name, description, category, sharing level, and notes.
3. Optionally use **Create from Budget** to seed lines from an existing budget.
4. Select **Create**. The template is saved and you return to the template list.
**Key concepts:** `template_structure` is a JSON object (`{ lines: [], metadata: null }`) initialized on creation; `sharing_level` controls visibility scope.
## Editing a budget template
The Edit Template page at `/fa/budget-templates/:id/edit` updates an existing budget template's name, description, category, sharing level, and notes. Permission required: `fa.budget_templates.edit`. (Note: the alternate route `/fa/reports/statements/templates/:templateId/edit` opens `StatementTemplateWizardPage` requiring `fa.statement-templates.update` — a separate flow.)
`BudgetTemplateEditPage` fetches the template via `useBudgetTemplateById` and renders `BudgetTemplateForm` pre-populated. On submit, `useUpdateBudgetTemplate` is called with `template_name`, `template_description`, `template_category`, `sharing_level`, and `notes`. On success, navigates to `/fa/budget-templates/:id`.
| Concept | Description |
| ----------------------------- | ---------------------------------------------------- |
| `BudgetTemplateForm` | Form for budget template metadata |
| `useBudgetTemplateById` | Hook fetching the existing budget template |
| `useUpdateBudgetTemplate` | Mutation hook persisting budget template edits |
| `StatementTemplateWizardPage` | Wizard for statement template edit (alternate route) |
| `sharing_level` | SME: confirm allowed values and access scope |
1. From the Budgeting Hub templates tab, open the budget template and click **Edit** to go to `/fa/budget-templates/:id/edit`.
2. Update `template_name`, `template_description`, `template_category`, `sharing_level`, and `notes`.
3. Click **Save**. On success you navigate to the template detail view.
## Related
Finance & Revenue core overview.
This page documents shipped product behavior. It is not medical, legal, or
billing advice. Verify against your organization's policies and applicable
regulations before using it for clinical, compliance, or billing decisions.
Protected health information (PHI) shown in the product is governed by your
tenant's access controls and is never exposed in this documentation.
* src/routes/fa.tsx
* src/cores/fa/pages/BudgetingHubPage.tsx
* src/cores/fa/pages/BudgetScenarioDetailPage.tsx
* src/cores/fa/pages/BudgetScenarioNewPage.tsx
* src/cores/fa/pages/BudgetScenarioEditPage.tsx
* src/cores/fa/pages/BudgetTemplateDetailPage.tsx
* src/cores/fa/pages/BudgetTemplateNewPage.tsx
* src/cores/fa/pages/BudgetTemplateEditPage.tsx
* src/cores/fa/hooks/useBudgetScenarioDetail.ts
* src/cores/fa/hooks/useBudgetScenarioMutation.ts
* src/cores/fa/hooks/useBudgetTemplateDetail.ts
* src/cores/fa/hooks/useBudgetTemplateMutation.ts
* src/cores/fa/components/BudgetScenarioForm.tsx
* src/cores/fa/components/BudgetTemplateForm.tsx
* src/cores/fa/components/ScenarioBudgetLineEditor.tsx
* src/cores/fa/components/ApplyTemplateDialog.tsx
* src/cores/fa/wizards/statement-template/StatementTemplateWizardPage.tsx