> ## Documentation Index
> Fetch the complete documentation index at: https://docs.encoreos.io/llms.txt
> Use this file to discover all available pages before exploring further.
# Finance & Accounting - Accounts Payable Guide
> The Accounts Payable (AP) module manages vendor relationships, bill entry, approval workflows, payment processing, and 1099 reporting for behavioral health org…
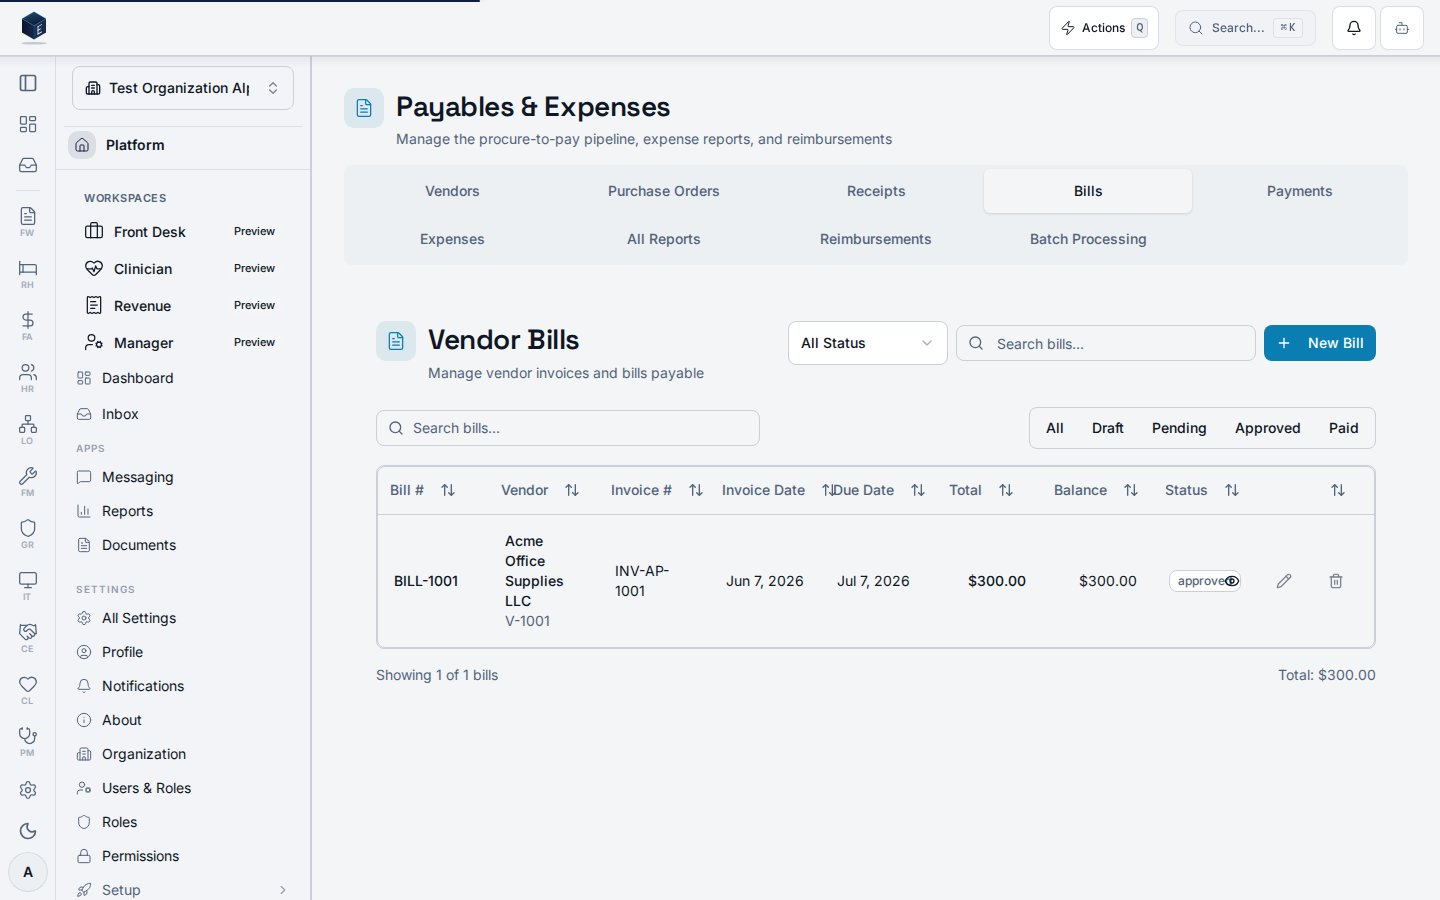 ## Overview
The Accounts Payable (AP) module manages vendor relationships, bill entry, approval workflows, payment processing, and 1099 reporting for behavioral health organizations. The system integrates with the General Ledger for automatic posting and supports multi-level approval workflows based on configurable amount thresholds.
## Table of Contents
1. [Vendor Management](#vendor-management)
2. [Bill Entry](#bill-entry)
3. [Bill Approval Workflow](#bill-approval-workflow)
4. [Payment Processing](#payment-processing)
5. [1099 Reporting](#1099-reporting)
6. [AP Aging Reports](#ap-aging-reports)
7. [Approval Thresholds Configuration](#approval-thresholds-configuration)
***
## Quick Reference
| I need to... | Pattern | Location |
| ----------------------------- | --------------------------------- | ----------------------------------------------------------------------- |
| Create a new vendor | Vendor Management | [Vendor Management](#vendor-management) |
| Enter a bill | Bill Entry | [Bill Entry](#bill-entry) |
| Approve a bill | Bill Approval Workflow | [Bill Approval Workflow](#bill-approval-workflow) |
| Process payments | Payment Processing | [Payment Processing](#payment-processing) |
| Generate 1099s | 1099 Reporting | [1099 Reporting](#1099-reporting) |
| Configure approval thresholds | Approval Thresholds Configuration | [Approval Thresholds Configuration](#approval-thresholds-configuration) |
***
## Vendor Management
### Creating Vendors
1. Navigate to **Finance** → **Vendors**
2. Click **New Vendor**
3. Fill in required fields:
* **Vendor Number**: Unique identifier (auto-generated or manual)
* **Vendor Name**: Legal business name
* **Address**: Complete mailing address
* **Contact Information**: Phone, email, website
4. **W-9 Information** (for 1099 reporting):
* **Tax ID (TIN)**: Encrypted storage of vendor tax identification number
* **Requires 1099**: Check if vendor requires 1099 reporting
* **1099 Type**: Select 1099-MISC or 1099-NEC
* **W-9 Document**: Upload W-9 form (stored securely)
5. **Payment Configuration**:
* **Payment Terms**: Net 15, Net 30, Net 60, Net 90, or Due on Receipt
* **Default GL Account**: Default expense account for bill entry
* **Bank Account** (optional): For ACH payments
* Bank account name
* Routing number (encrypted)
* Account number (encrypted)
6. **Status**: Active or Inactive
### Vendor Best Practices
* **Unique Vendor Numbers**: Use consistent numbering scheme (e.g., V-001, V-002)
* **Complete W-9 Data**: Collect W-9 forms before first payment to ensure 1099 accuracy
* **Payment Terms**: Set appropriate terms based on vendor agreements
* **Default Accounts**: Configure default GL accounts to speed up bill entry
* **Vendor Inactivation**: Mark vendors as inactive instead of deleting (preserves history)
### Searching and Filtering Vendors
* **Search**: By vendor name, number, or contact information
* **Filter**: By active/inactive status, 1099 requirement
* **Sort**: By name, number, or last bill date
***
## Bill Entry
### Creating Bills
1. Navigate to **Finance** → **Bills**
2. Click **New Bill**
3. **Bill Header**:
* **Vendor**: Select from vendor list (required)
* **Invoice Number**: Vendor's invoice number (required, must be unique per vendor)
* **Invoice Date**: Date on vendor invoice
* **Due Date**: Payment due date (defaults based on vendor payment terms)
* **Description**: Optional bill description or memo
4. **Bill Lines** (add unlimited lines):
* **GL Account**: Select expense or asset account (required)
* **Fund**: Select fund for fund accounting (if required)
* **Department**: Select department (optional)
* **Program**: Select program (optional)
* **Description**: Line item description
* **Amount**: Line amount (required)
* **Amount Paid**: Auto-calculated from payment applications
5. **Bill Total**: Auto-calculated from line items
6. **Save Options**:
* **Save as Draft**: Save for later editing
* **Submit for Approval**: Submit to approval workflow (if over threshold)
### Bill Status Workflow
**Draft** → **Pending Approval** → **Approved** → **Paid**
* **Draft**: Bill is being entered or edited
* **Pending Approval**: Submitted and awaiting approver action
* **Approved**: Approved and posted to GL (journal entry created)
* **Paid**: Fully paid (all lines paid)
* **Cancelled**: Bill cancelled (cannot be paid)
### Bill Entry Best Practices
* **Verify Invoice Numbers**: System prevents duplicate invoice numbers per vendor
* **Accurate GL Coding**: Code each line to appropriate expense/asset account
* **Fund Allocation**: Assign to correct fund for fund accounting compliance
* **Attach Invoices**: Upload invoice PDFs for audit trail
* **Review Totals**: Verify bill total matches vendor invoice before submission
### Editing Bills
* **Draft Bills**: Can be edited freely
* **Pending Approval**: Cannot be edited (must reject first)
* **Approved Bills**: Cannot be edited (create credit memo or reversing entry)
* **Paid Bills**: Cannot be edited (immutable for audit trail)
***
## Bill Approval Workflow
### Approval Process
1. **Submit for Approval**:
* Click **Submit for Approval** on draft bill
* Bill status changes to "Pending Approval"
* System checks approval thresholds (if configured)
2. **Threshold-Based Routing**:
* Bills under threshold: Auto-approved (if configured)
* Bills over threshold: Route to designated approver
* Multiple thresholds: Route to highest required approver
3. **Approver Actions**:
* **Approve**: Approves bill and posts to GL
* Creates journal entry (DR Expense/Asset, CR Accounts Payable)
* Updates bill status to "Approved"
* Sends notification to bill submitter
* **Reject**: Returns bill to draft with rejection reason
* Bill status reverts to "Draft"
* Rejection reason appended to bill description
* Sends notification to bill submitter
### Approval Indicators
* **GL Posting Indicator**: Shows on approved bills
* Journal entry number
* Posting date
* Link to journal entry detail
* **Approval History**: Timeline of approval actions
* Approver name and date
* Rejection reasons (if applicable)
### Approval Best Practices
* **Review Before Approving**: Verify GL coding, amounts, and vendor
* **Document Rejections**: Provide clear rejection reasons
* **Timely Approvals**: Approve within 2 business days (SLA target)
* **Delegate When Needed**: Use approval delegation for absences
***
## Payment Processing
### Creating Payment Batches
1. Navigate to **Finance** → **Payment Batches**
2. Click **New Payment Batch**
3. **Batch Configuration**:
* **Payment Date**: Date payments will be processed
* **Bank Account**: Select bank account for payment
* **Payment Method**: Check, ACH, or Wire
* **Description**: Optional batch description
4. **Select Bills to Pay**:
* Filter by vendor, due date, amount, or status
* Select bills from list
* System shows total batch amount
5. **Payment Application**:
* For each bill, specify payment amount:
* **Full Payment**: Pay entire bill balance
* **Partial Payment**: Pay specific amount
* System validates payment doesn't exceed bill balance
6. **Generate Payments**:
* System creates individual payment records
* Assigns check numbers (if check payment)
* Creates payment applications linking payments to bills
7. **Post Batch**:
* Posts payments to GL (DR Accounts Payable, CR Cash)
* Updates bill status to "Paid" (if fully paid)
* Updates bill balances
* Batch status changes to "Posted"
### Payment Methods
**Check Payments:**
* Check numbers auto-generated sequentially
* Check printing integration (deferred)
* Manual check number entry supported
**ACH Payments:**
* ACH file generation (NACHA format)
* Bank account information from vendor record
* Batch file export for bank upload
**Wire Payments:**
* Manual wire processing
* Wire confirmation tracking
### Payment Application
* **Automatic Application**: Payments automatically applied to bills
* **Partial Payments**: Support for paying bills in installments
* **Line-Level Application**: Payments can be applied to specific bill lines
* **Balance Tracking**: System tracks:
* Bill total
* Amount paid
* Balance due
### Payment Best Practices
* **Batch Processing**: Process payments in batches for efficiency
* **Verify Before Posting**: Review batch totals before posting
* **Timely Payments**: Process payments by due date
* **Reconcile Regularly**: Reconcile payments with bank statements
* **Document Wire Payments**: Record wire confirmation numbers
***
## 1099 Reporting
### Generating 1099 Reports
1. Navigate to **Finance** → **Reports** → **1099 Reporting**
2. **Select Tax Year**: Choose year for 1099 reporting (defaults to prior year)
3. **Filter Options**:
* **1099 Type**: Filter by 1099-MISC, 1099-NEC, or All
* **Vendor**: Filter by specific vendor (optional)
4. **Report Display**:
* **Vendor Information**: Name, vendor number, masked TIN
* **Total Payments**: Sum of all 1099-eligible payments for year
* **Payment Count**: Number of payments
* **1099 Type**: Form type (MISC or NEC)
5. **Export**: Download report for 1099 filing
### 1099 Eligibility
**Vendors Requiring 1099:**
* Must have `requires_1099 = true` in vendor record
* Must have 1099 type selected (MISC or NEC)
* Must have valid TIN on file
**Payment Eligibility:**
* Only payments to 1099-eligible vendors included
* Minimum \$600 threshold (IRS requirement)
* Excludes reimbursements and non-1099 payments
### 1099 Best Practices
* **Collect W-9s Early**: Get W-9 forms before first payment
* **Verify TINs**: Ensure accurate tax ID numbers
* **Annual Review**: Generate 1099 report annually (January)
* **Export for Filing**: Use export function for 1099 filing software
* **Retain Records**: Keep 1099 records for 7 years (IRS requirement)
***
## AP Aging Reports
### Viewing AP Aging
1. Navigate to **Finance** → **Reports** → **AP Aging**
2. **Report Options**:
* **As-of Date**: Select date for aging calculation
* **Vendor Filter**: Filter by specific vendor (optional)
* **Status Filter**: Show only approved, pending, or all bills
3. **Aging Buckets**:
* **Current (0-30 days)**: Bills not yet due
* **31-60 days**: Bills 31-60 days past due
* **61-90 days**: Bills 61-90 days past due
* **91-120 days**: Bills 91-120 days past due
* **120+ days**: Bills over 120 days past due
4. **Report Details**:
* Vendor name and number
* Bill number and invoice number
* Invoice date and due date
* Bill total and balance due
* Days past due
* Aging bucket
### AP Aging Best Practices
* **Regular Review**: Run aging report weekly or monthly
* **Prioritize Old Bills**: Focus on 90+ day bills first
* **Contact Vendors**: Reach out to vendors with overdue bills
* **Cash Flow Planning**: Use aging report for cash flow forecasting
* **Vendor Relations**: Maintain good relationships with timely payments
***
## Approval Thresholds Configuration
### Setting Approval Thresholds
1. Navigate to **Finance** → **Settings** → **Approval Thresholds**
2. Click **New Threshold**
3. **Threshold Configuration**:
* **Module**: Select "AP Bills"
* **Threshold Amount**: Minimum bill amount requiring approval
* **Approver Role**: Select approver role (e.g., finance\_admin, manager)
* **Approver User**: Select specific user (optional, overrides role)
* **Description**: Optional threshold description
4. **Multiple Thresholds**: Create multiple thresholds for different amount ranges
* Example: $0-$1,000 (auto-approve), $1,000-$10,000 (manager approval), \$10,000+ (CFO approval)
### Threshold Logic
* **Highest Threshold Wins**: Bills route to approver for highest applicable threshold
* **Role-Based**: Bills route to users with specified role
* **User-Specific**: User selection overrides role-based routing
* **Auto-Approve**: Bills under lowest threshold auto-approved (if configured)
### Approval Threshold Best Practices
* **Start Conservative**: Set lower thresholds initially, adjust based on experience
* **Document Rationale**: Document why thresholds are set at specific amounts
* **Review Regularly**: Review and adjust thresholds quarterly
* **Consider Cash Flow**: Factor in cash flow impact of approval delays
* **Delegate Authority**: Use delegation for approver absences
***
## Common Tasks
### Finding a Bill
1. Navigate to **Finance** → **Bills**
2. Use search or filters:
* **Search**: By bill number, invoice number, or vendor name
* **Filter**: By status, vendor, date range, or amount
3. Click bill to view detail
### Viewing Bill History
1. Navigate to vendor detail page
2. Click **Bills** tab
3. View all bills for vendor with status and amounts
### Processing a Single Payment
1. Navigate to bill detail page
2. Click **Create Payment**
3. Enter payment details:
* Payment date
* Payment amount (full or partial)
* Payment method
4. Click **Process Payment**
5. System creates payment and applies to bill
### Rejecting a Bill
1. Navigate to bill detail page (must be pending approval)
2. Click **Reject**
3. Enter rejection reason (required)
4. Click **Confirm Rejection**
5. Bill returns to draft status with rejection reason
### Exporting 1099 Data
1. Navigate to **Finance** → **Reports** → **1099 Reporting**
2. Select tax year
3. Apply filters (if needed)
4. Click **Export**
5. Download CSV or Excel file for 1099 filing software
***
## Troubleshooting
### Bill Won't Submit for Approval
**Possible Causes:**
* Bill is missing required fields (vendor, invoice number, lines)
* Bill total is zero
* Bill has validation errors
**Solution:**
* Review bill form for missing required fields
* Add at least one bill line with amount
* Check for validation error messages
### Payment Application Fails
**Possible Causes:**
* Payment amount exceeds bill balance
* Bill is not approved
* Payment batch is already posted
**Solution:**
* Verify payment amount doesn't exceed bill balance
* Ensure bill is approved before payment
* Create new payment batch if needed
### 1099 Report Missing Vendors
**Possible Causes:**
* Vendor doesn't have `requires_1099` checked
* Vendor payments are under \$600 threshold
* Payments are in different tax year
**Solution:**
* Verify vendor 1099 configuration
* Check payment totals meet \$600 threshold
* Verify tax year selection matches payment dates
### GL Posting Not Appearing
**Possible Causes:**
* Bill not yet approved
* Journal entry creation failed
* GL period is closed
**Solution:**
* Verify bill status is "Approved"
* Check GL posting indicator on bill detail
* Verify fiscal period is open for posting
***
## Security & Compliance
### Data Protection
* **Tax ID Encryption**: Vendor TINs encrypted at rest
* **Bank Account Encryption**: Bank account numbers encrypted
* **Access Control**: Role-based access (finance\_admin, finance\_staff)
* **Audit Trail**: All bill and payment changes logged
### Compliance Requirements
* **1099 Reporting**: IRS-compliant 1099 generation
* **Payment Records**: 7-year retention (IRS requirement)
* **Audit Trail**: Complete audit trail for all transactions
* **Multi-Tenancy**: Strict organization isolation (RLS)
### Best Practices
* **Regular Backups**: Ensure regular database backups
* **Access Reviews**: Review user access quarterly
* **Document Retention**: Follow IRS 7-year retention policy
* **Security Updates**: Keep system updated with security patches
***
## Related Documentation
* [Chart of Accounts Guide v1.0](/fa/chart-of-accounts-guide) - GL account setup
* [General Ledger Guide v1.0](/fa/general-ledger-guide) - Journal entry management
***
**Last Updated:** 2026-01-27\
**Version:** 1.0.0
## Overview
The Accounts Payable (AP) module manages vendor relationships, bill entry, approval workflows, payment processing, and 1099 reporting for behavioral health organizations. The system integrates with the General Ledger for automatic posting and supports multi-level approval workflows based on configurable amount thresholds.
## Table of Contents
1. [Vendor Management](#vendor-management)
2. [Bill Entry](#bill-entry)
3. [Bill Approval Workflow](#bill-approval-workflow)
4. [Payment Processing](#payment-processing)
5. [1099 Reporting](#1099-reporting)
6. [AP Aging Reports](#ap-aging-reports)
7. [Approval Thresholds Configuration](#approval-thresholds-configuration)
***
## Quick Reference
| I need to... | Pattern | Location |
| ----------------------------- | --------------------------------- | ----------------------------------------------------------------------- |
| Create a new vendor | Vendor Management | [Vendor Management](#vendor-management) |
| Enter a bill | Bill Entry | [Bill Entry](#bill-entry) |
| Approve a bill | Bill Approval Workflow | [Bill Approval Workflow](#bill-approval-workflow) |
| Process payments | Payment Processing | [Payment Processing](#payment-processing) |
| Generate 1099s | 1099 Reporting | [1099 Reporting](#1099-reporting) |
| Configure approval thresholds | Approval Thresholds Configuration | [Approval Thresholds Configuration](#approval-thresholds-configuration) |
***
## Vendor Management
### Creating Vendors
1. Navigate to **Finance** → **Vendors**
2. Click **New Vendor**
3. Fill in required fields:
* **Vendor Number**: Unique identifier (auto-generated or manual)
* **Vendor Name**: Legal business name
* **Address**: Complete mailing address
* **Contact Information**: Phone, email, website
4. **W-9 Information** (for 1099 reporting):
* **Tax ID (TIN)**: Encrypted storage of vendor tax identification number
* **Requires 1099**: Check if vendor requires 1099 reporting
* **1099 Type**: Select 1099-MISC or 1099-NEC
* **W-9 Document**: Upload W-9 form (stored securely)
5. **Payment Configuration**:
* **Payment Terms**: Net 15, Net 30, Net 60, Net 90, or Due on Receipt
* **Default GL Account**: Default expense account for bill entry
* **Bank Account** (optional): For ACH payments
* Bank account name
* Routing number (encrypted)
* Account number (encrypted)
6. **Status**: Active or Inactive
### Vendor Best Practices
* **Unique Vendor Numbers**: Use consistent numbering scheme (e.g., V-001, V-002)
* **Complete W-9 Data**: Collect W-9 forms before first payment to ensure 1099 accuracy
* **Payment Terms**: Set appropriate terms based on vendor agreements
* **Default Accounts**: Configure default GL accounts to speed up bill entry
* **Vendor Inactivation**: Mark vendors as inactive instead of deleting (preserves history)
### Searching and Filtering Vendors
* **Search**: By vendor name, number, or contact information
* **Filter**: By active/inactive status, 1099 requirement
* **Sort**: By name, number, or last bill date
***
## Bill Entry
### Creating Bills
1. Navigate to **Finance** → **Bills**
2. Click **New Bill**
3. **Bill Header**:
* **Vendor**: Select from vendor list (required)
* **Invoice Number**: Vendor's invoice number (required, must be unique per vendor)
* **Invoice Date**: Date on vendor invoice
* **Due Date**: Payment due date (defaults based on vendor payment terms)
* **Description**: Optional bill description or memo
4. **Bill Lines** (add unlimited lines):
* **GL Account**: Select expense or asset account (required)
* **Fund**: Select fund for fund accounting (if required)
* **Department**: Select department (optional)
* **Program**: Select program (optional)
* **Description**: Line item description
* **Amount**: Line amount (required)
* **Amount Paid**: Auto-calculated from payment applications
5. **Bill Total**: Auto-calculated from line items
6. **Save Options**:
* **Save as Draft**: Save for later editing
* **Submit for Approval**: Submit to approval workflow (if over threshold)
### Bill Status Workflow
**Draft** → **Pending Approval** → **Approved** → **Paid**
* **Draft**: Bill is being entered or edited
* **Pending Approval**: Submitted and awaiting approver action
* **Approved**: Approved and posted to GL (journal entry created)
* **Paid**: Fully paid (all lines paid)
* **Cancelled**: Bill cancelled (cannot be paid)
### Bill Entry Best Practices
* **Verify Invoice Numbers**: System prevents duplicate invoice numbers per vendor
* **Accurate GL Coding**: Code each line to appropriate expense/asset account
* **Fund Allocation**: Assign to correct fund for fund accounting compliance
* **Attach Invoices**: Upload invoice PDFs for audit trail
* **Review Totals**: Verify bill total matches vendor invoice before submission
### Editing Bills
* **Draft Bills**: Can be edited freely
* **Pending Approval**: Cannot be edited (must reject first)
* **Approved Bills**: Cannot be edited (create credit memo or reversing entry)
* **Paid Bills**: Cannot be edited (immutable for audit trail)
***
## Bill Approval Workflow
### Approval Process
1. **Submit for Approval**:
* Click **Submit for Approval** on draft bill
* Bill status changes to "Pending Approval"
* System checks approval thresholds (if configured)
2. **Threshold-Based Routing**:
* Bills under threshold: Auto-approved (if configured)
* Bills over threshold: Route to designated approver
* Multiple thresholds: Route to highest required approver
3. **Approver Actions**:
* **Approve**: Approves bill and posts to GL
* Creates journal entry (DR Expense/Asset, CR Accounts Payable)
* Updates bill status to "Approved"
* Sends notification to bill submitter
* **Reject**: Returns bill to draft with rejection reason
* Bill status reverts to "Draft"
* Rejection reason appended to bill description
* Sends notification to bill submitter
### Approval Indicators
* **GL Posting Indicator**: Shows on approved bills
* Journal entry number
* Posting date
* Link to journal entry detail
* **Approval History**: Timeline of approval actions
* Approver name and date
* Rejection reasons (if applicable)
### Approval Best Practices
* **Review Before Approving**: Verify GL coding, amounts, and vendor
* **Document Rejections**: Provide clear rejection reasons
* **Timely Approvals**: Approve within 2 business days (SLA target)
* **Delegate When Needed**: Use approval delegation for absences
***
## Payment Processing
### Creating Payment Batches
1. Navigate to **Finance** → **Payment Batches**
2. Click **New Payment Batch**
3. **Batch Configuration**:
* **Payment Date**: Date payments will be processed
* **Bank Account**: Select bank account for payment
* **Payment Method**: Check, ACH, or Wire
* **Description**: Optional batch description
4. **Select Bills to Pay**:
* Filter by vendor, due date, amount, or status
* Select bills from list
* System shows total batch amount
5. **Payment Application**:
* For each bill, specify payment amount:
* **Full Payment**: Pay entire bill balance
* **Partial Payment**: Pay specific amount
* System validates payment doesn't exceed bill balance
6. **Generate Payments**:
* System creates individual payment records
* Assigns check numbers (if check payment)
* Creates payment applications linking payments to bills
7. **Post Batch**:
* Posts payments to GL (DR Accounts Payable, CR Cash)
* Updates bill status to "Paid" (if fully paid)
* Updates bill balances
* Batch status changes to "Posted"
### Payment Methods
**Check Payments:**
* Check numbers auto-generated sequentially
* Check printing integration (deferred)
* Manual check number entry supported
**ACH Payments:**
* ACH file generation (NACHA format)
* Bank account information from vendor record
* Batch file export for bank upload
**Wire Payments:**
* Manual wire processing
* Wire confirmation tracking
### Payment Application
* **Automatic Application**: Payments automatically applied to bills
* **Partial Payments**: Support for paying bills in installments
* **Line-Level Application**: Payments can be applied to specific bill lines
* **Balance Tracking**: System tracks:
* Bill total
* Amount paid
* Balance due
### Payment Best Practices
* **Batch Processing**: Process payments in batches for efficiency
* **Verify Before Posting**: Review batch totals before posting
* **Timely Payments**: Process payments by due date
* **Reconcile Regularly**: Reconcile payments with bank statements
* **Document Wire Payments**: Record wire confirmation numbers
***
## 1099 Reporting
### Generating 1099 Reports
1. Navigate to **Finance** → **Reports** → **1099 Reporting**
2. **Select Tax Year**: Choose year for 1099 reporting (defaults to prior year)
3. **Filter Options**:
* **1099 Type**: Filter by 1099-MISC, 1099-NEC, or All
* **Vendor**: Filter by specific vendor (optional)
4. **Report Display**:
* **Vendor Information**: Name, vendor number, masked TIN
* **Total Payments**: Sum of all 1099-eligible payments for year
* **Payment Count**: Number of payments
* **1099 Type**: Form type (MISC or NEC)
5. **Export**: Download report for 1099 filing
### 1099 Eligibility
**Vendors Requiring 1099:**
* Must have `requires_1099 = true` in vendor record
* Must have 1099 type selected (MISC or NEC)
* Must have valid TIN on file
**Payment Eligibility:**
* Only payments to 1099-eligible vendors included
* Minimum \$600 threshold (IRS requirement)
* Excludes reimbursements and non-1099 payments
### 1099 Best Practices
* **Collect W-9s Early**: Get W-9 forms before first payment
* **Verify TINs**: Ensure accurate tax ID numbers
* **Annual Review**: Generate 1099 report annually (January)
* **Export for Filing**: Use export function for 1099 filing software
* **Retain Records**: Keep 1099 records for 7 years (IRS requirement)
***
## AP Aging Reports
### Viewing AP Aging
1. Navigate to **Finance** → **Reports** → **AP Aging**
2. **Report Options**:
* **As-of Date**: Select date for aging calculation
* **Vendor Filter**: Filter by specific vendor (optional)
* **Status Filter**: Show only approved, pending, or all bills
3. **Aging Buckets**:
* **Current (0-30 days)**: Bills not yet due
* **31-60 days**: Bills 31-60 days past due
* **61-90 days**: Bills 61-90 days past due
* **91-120 days**: Bills 91-120 days past due
* **120+ days**: Bills over 120 days past due
4. **Report Details**:
* Vendor name and number
* Bill number and invoice number
* Invoice date and due date
* Bill total and balance due
* Days past due
* Aging bucket
### AP Aging Best Practices
* **Regular Review**: Run aging report weekly or monthly
* **Prioritize Old Bills**: Focus on 90+ day bills first
* **Contact Vendors**: Reach out to vendors with overdue bills
* **Cash Flow Planning**: Use aging report for cash flow forecasting
* **Vendor Relations**: Maintain good relationships with timely payments
***
## Approval Thresholds Configuration
### Setting Approval Thresholds
1. Navigate to **Finance** → **Settings** → **Approval Thresholds**
2. Click **New Threshold**
3. **Threshold Configuration**:
* **Module**: Select "AP Bills"
* **Threshold Amount**: Minimum bill amount requiring approval
* **Approver Role**: Select approver role (e.g., finance\_admin, manager)
* **Approver User**: Select specific user (optional, overrides role)
* **Description**: Optional threshold description
4. **Multiple Thresholds**: Create multiple thresholds for different amount ranges
* Example: $0-$1,000 (auto-approve), $1,000-$10,000 (manager approval), \$10,000+ (CFO approval)
### Threshold Logic
* **Highest Threshold Wins**: Bills route to approver for highest applicable threshold
* **Role-Based**: Bills route to users with specified role
* **User-Specific**: User selection overrides role-based routing
* **Auto-Approve**: Bills under lowest threshold auto-approved (if configured)
### Approval Threshold Best Practices
* **Start Conservative**: Set lower thresholds initially, adjust based on experience
* **Document Rationale**: Document why thresholds are set at specific amounts
* **Review Regularly**: Review and adjust thresholds quarterly
* **Consider Cash Flow**: Factor in cash flow impact of approval delays
* **Delegate Authority**: Use delegation for approver absences
***
## Common Tasks
### Finding a Bill
1. Navigate to **Finance** → **Bills**
2. Use search or filters:
* **Search**: By bill number, invoice number, or vendor name
* **Filter**: By status, vendor, date range, or amount
3. Click bill to view detail
### Viewing Bill History
1. Navigate to vendor detail page
2. Click **Bills** tab
3. View all bills for vendor with status and amounts
### Processing a Single Payment
1. Navigate to bill detail page
2. Click **Create Payment**
3. Enter payment details:
* Payment date
* Payment amount (full or partial)
* Payment method
4. Click **Process Payment**
5. System creates payment and applies to bill
### Rejecting a Bill
1. Navigate to bill detail page (must be pending approval)
2. Click **Reject**
3. Enter rejection reason (required)
4. Click **Confirm Rejection**
5. Bill returns to draft status with rejection reason
### Exporting 1099 Data
1. Navigate to **Finance** → **Reports** → **1099 Reporting**
2. Select tax year
3. Apply filters (if needed)
4. Click **Export**
5. Download CSV or Excel file for 1099 filing software
***
## Troubleshooting
### Bill Won't Submit for Approval
**Possible Causes:**
* Bill is missing required fields (vendor, invoice number, lines)
* Bill total is zero
* Bill has validation errors
**Solution:**
* Review bill form for missing required fields
* Add at least one bill line with amount
* Check for validation error messages
### Payment Application Fails
**Possible Causes:**
* Payment amount exceeds bill balance
* Bill is not approved
* Payment batch is already posted
**Solution:**
* Verify payment amount doesn't exceed bill balance
* Ensure bill is approved before payment
* Create new payment batch if needed
### 1099 Report Missing Vendors
**Possible Causes:**
* Vendor doesn't have `requires_1099` checked
* Vendor payments are under \$600 threshold
* Payments are in different tax year
**Solution:**
* Verify vendor 1099 configuration
* Check payment totals meet \$600 threshold
* Verify tax year selection matches payment dates
### GL Posting Not Appearing
**Possible Causes:**
* Bill not yet approved
* Journal entry creation failed
* GL period is closed
**Solution:**
* Verify bill status is "Approved"
* Check GL posting indicator on bill detail
* Verify fiscal period is open for posting
***
## Security & Compliance
### Data Protection
* **Tax ID Encryption**: Vendor TINs encrypted at rest
* **Bank Account Encryption**: Bank account numbers encrypted
* **Access Control**: Role-based access (finance\_admin, finance\_staff)
* **Audit Trail**: All bill and payment changes logged
### Compliance Requirements
* **1099 Reporting**: IRS-compliant 1099 generation
* **Payment Records**: 7-year retention (IRS requirement)
* **Audit Trail**: Complete audit trail for all transactions
* **Multi-Tenancy**: Strict organization isolation (RLS)
### Best Practices
* **Regular Backups**: Ensure regular database backups
* **Access Reviews**: Review user access quarterly
* **Document Retention**: Follow IRS 7-year retention policy
* **Security Updates**: Keep system updated with security patches
***
## Related Documentation
* [Chart of Accounts Guide v1.0](/fa/chart-of-accounts-guide) - GL account setup
* [General Ledger Guide v1.0](/fa/general-ledger-guide) - Journal entry management
***
**Last Updated:** 2026-01-27\
**Version:** 1.0.0